Getting started with the GD32VF103 RISC-V microcontroller
Using the open source tools GCC, Eclipse and OpenOCD
Introduction
From the very beginning the RISC-V open CPU architecture got many people excited, as it introduced a promising new open source hardware platform designed by academia and backed by large industry players. An instruction set free of royalties allows the production of cheaper chips and products, with the same functionality. However initially the RISC-V instruction set, were just some specification documents, and it largely remained theoretical and far away from practical use. Luckily in recent years more and more CPU’s have been coming out which use this exciting new instruction set. This guide is written to show how to use a modern 32-bit RISC-V MCU and to program a blinky LED, using open source tools, such as Eclipse, OpenOCD and the RISC-V GNU tool-chain.
This guide uses the vanilla Eclipse for embedded development, alternatively you could use the Nuclei IDE, which is made to work out of the box with the GD32VF103 microcontrollers. The advantage of using vanilla Eclipse is that you can also easily use it for microcontrollers from other vendors.
About the manufacturer and the microcontroller
The GD32VF103 is a family of microcontrollers from the manufacturer GigaDevice. These microcontrollers are similar in feature set, code structure and development workflow to some of their ARM M3/4 counterparts. A highlight of some of the features include 128K Flash, 32k RAM, 2x1bit ADC, I2C, SPI and USB 2.0 FS, the price is starting from around $1.50. GigaDevice is a Chinese company founded in 2005 and have been producing microcontrollers since 2013. Starting in 2019 they have introduced RISC-V based microcontrollers in their product offerings.
About the development board
In this article I’ll be using the GD32VF103T-START from the manufacturer GigaDevice. Note that the C variant is very similar and this guide should work the same, just select a different demo project when debugging at the end of the article. The GD32VF103T-START development board uses a GD32VF103TBU6 microcontroller, which is connected to the computer using the onboard GD-Link programmer. The GD-Link programmer will be used to load the program code into the microcontroller using OpenOCD. GD-Link is similar to JTAG and uses the CMSIS-DAP driver. Just in case you are wondering, I bought my development board on the website of TME Europe, for about $50 including shipping.
This development board is expandable with open header footprints, as these will allow you to connect additional hardware. However if you don’t intend on expanding the board, the development options are quite limited, since there is only one LED and one button connected to the development microcontroller. The USB port and Serial over USB port are also available.

Setting up your development environment
Overview
This guide assumes your operating system is Ubuntu 20.04 or later. If you use another operating system I’ll point out some alternatives when this is applicable.
- Setting up the RISC-V GNU Compiler toolchain
- Setting up Eclipse with prerequisites
- Setting up OpenOCD with prerequisites
Installing the RISC-V GNU Compiler tool-chain
Before installing anything, first update your software to the latest version:
$ sudo apt-get update
$ sudo apt-get upgrade
In this guide I’ll use a project directory named riscv-tools, which I’ll place in my home directory:
$ mkdir ~/riscv-toolsFirst we will install the latest GNU RISC-V embedded C/C++ tool-chain that we will get from the xPack website. There are two main ways to install the tool-chain on your computer.
Option 1. Using XPM:
The easiest way to get the tool-chain is to use the xpm command to install the latest release version. For that you will first have to have node.js and xpm installed:
$ sudo apt-get install nodejs npm
$ sudo npm install --global xpm@latest
Then you can install the compiler tool-chain by issuing:
$ xpm install --global @xpack-dev-tools/riscv-none-embed-gcc@latest --verboseOption 2. Download the release package
If you don’t want to install a package, you can also download a release package, unpack it and place it in the riscv-tools directory. In order to do that, download the latest compiler tool-chain from https://github.com/xpack-dev-tools/riscv-none-embed-gcc-xpack/releases/
Unpack the downloaded files into the desired tool-chain location:
$ tar xvf xpack-riscv-none-embed-gcc-10.1.0-1.1-linux-x64.tar.gz
$ mv xpack-riscv-none-embed-gcc-10.1.0-1.1/* ~/riscv-tools/
Installing Eclipse
Now that we have setup the RISC-V GNU Compiler tool-chain, we continue by installing the Eclipse IDE.
First install the Java Runtime Environment (JRE) to be able to run eclipse:
$ sudo apt-get install default-jreDownload and install the latest eclipse installer package, by going to https://www.eclipse.org/downloads/packages/release/2021-06/r
The Eclipse Installer allows you to select the type of Eclipse installation you would like to have during installation.
$ tar xvf eclipse-inst-jre-linux64.tar.gz
$ cd eclipse-installer
$ ./eclipse-inst
When prompted during installation, choose Eclipse IDE for Embedded C/C++ Developers. Afterwards the Eclipse IDE is installed and can be launched from the application menu.
Installing OpenOCD
OpenOCD is an application that allows you to program and debug the micro-controller (also known as MCU). OpenOCD is designed to support many different micro-controllers from various vendors, and support multiple communication protocols and hardware specific interfaces. It unifies micro-controller development and production support in one application.
Because the MCU is relatively new it is not yet fully supported in the latest mainline OpenOCD release package (V11.0.1), connecting to the development board is possible with that version but the programming of the flash isn’t.
Therefore we have to use another version of OpenOCD that does support this MCU. And for that we have to compile a version of the specialized RISC-V OpenOCD (V11 dev) from GitHub.
Compiling the RISC-V OpenOCD from source
The RISC-V OpenOCD application is compiled from source, this way it includes the required support for flash programming via GD-Link. On Ubuntu the compilation of OpenOCD is straightforward, just install the dependencies with the apt-get command, and then you are ready to compile OpenOCD. However if you are on another platform you likely have to compile HIDAPI from source as well and tell OpenOCD where to find that library when compiling it, this will be slightly more involved. HIDAPI is a library required for the support of CMSIS-DAP, which is what is used to communicate with GD-Link.
1. Prepare the required dependencies:
# If you haven’t already, make sure you have git
$ sudo apt-get install git# And the build tools and libraries:
$ sudo apt-get install make libtool pkg-config autoconf automake
$ sudo apt-get install texinfo libusb-1.0 libhidapi-dev
2. Download RISC-V OpenOCD
$ git clone https://github.com/riscv/riscv-openocd.git
$ cd riscv-openocd
For reference, I used commit id: 13cfec45c (#640), August 2021, later versions should work as well.
3. Configure RISC-V OpenOCD
Configure the source with CMSIS-DAP support:
$ ./bootstrap
$ ./configure --enable-cmsis_dap
At the end of the configuration output, the supported interfaces are shown in a list and the CMSIS-DAP interface should be there as well and set to yes. If it is not, please make sure the required libraries are installed and try again.
4. Compile OpenOCD
$ make5. Install the compiled program
There are two options for installing OpenOCD, the default ‘make install’ command which makes OpenOCD available system wide. Alternatively it is also possible to install it to a specified directory and configure Eclipse to find it.
# Option 5a: System install
$ sudo make install# Or alternatively Option 5b: Local install
$ mkdir ~/riscv-tools/openocd/
$ export DESTDIR=”$HOME/riscv-tools/openocd/” && make install
Now the OpenOCD program has been installed.
Preparing Linux for a GD-Link device
For any OpenOCD installation on Linux, you should tell the udev device manager that the GD-Link programmer can be accessed by any user, not just root. Luckily for us, the OpenOCD developers already thought of that. All that needs to be done is copying the supplied device rules file to your local udev rules settings, then reload udevadm.
# Copy the rules file to /etc/udev/rules.d
$ sudo cp contrib/60-openocd.rules /etc/udev/rules.d/# reload udevadm for the changes to take effect
$ sudo udevadm control --reload
Then re-plugin the development board to have the changes take effect.
Opening the example project
In order to get the blinky LED project to work we will download the source files from the manufacturers website: http://www.gd32mcu.com/en/download/0?kw=GD32VF1. Here you can find the documentation for the GD32VF1 family of microcontrollers, as well as application notes, programming tools and source code.
For this guide, all we need is the source code package.
- GD32VF103 Demo Suites
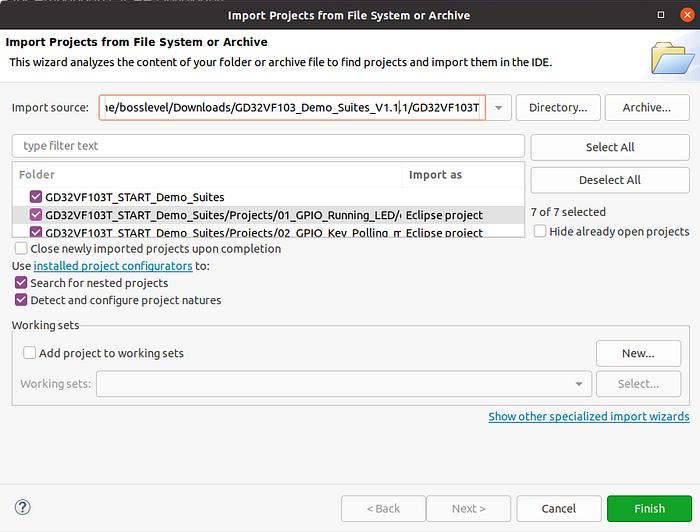
With this package we can quickly open the example blinky LED project and run our first program! First download and unpack the demo software:
$ unrar x GD32VF103_Demo_Suites_V1.1.1.rarThen start Eclipse and go to “File → Open projects from file system”, there you select Directory… and choose the directory for your development board, in this case ‘GD32VF103T_START_Demo_Suites’, because I’m using the T version. Then click Finish to complete. Eclipse may take a moment to process the files.
Configure the compiler
In the project explorer open the project ‘01_GPIO_Running_LED’, and the sub-directory called ‘GD32VF103T_START’.
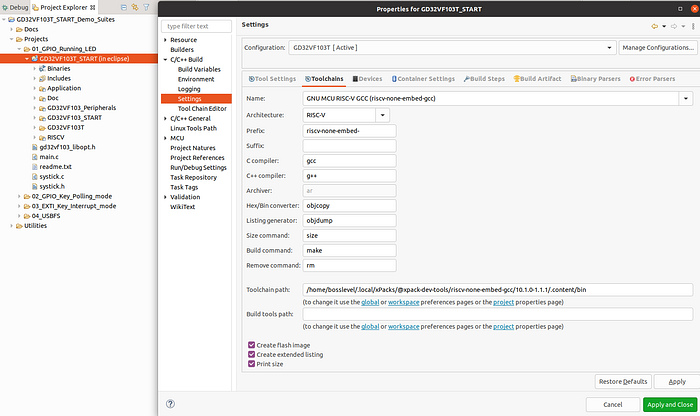
If you installed the GNU RISC-V Tool-chain using xpm, then eclipse will have likely already configured the path correctly. Otherwise right click the GD32VF103T_START directory and go to Properties. Then go to ”C/C++ Build → Settings”. There in the Tool-chain path enter the full tool-chain path to the bin directory of the GNU RISC-V Tool-chain.
Configure OpenOCD
In order to program and debug the code on the development board we have to set the path to the OpenOCD debugger.
Right click on GD32VF103T_START in the project explorer, then go to Properties, then choose ”MCU → OpenOCD Path”, enter the executable name which is openocd (without quotes) and enter the Folder value for example (also without quotes):
‘/home/user/riscv-tools/openocd/usr/local/bin’
Create a debug configuration
Now click on the debug icon, to start the debugger. You’ll see that you first have to create a debug configuration. This is where we will set some specifics for the development board and MCU we are using.
In the Debug configuration window double click on GDB OpenOCD Debugging. Now a new debug configuration has been created.
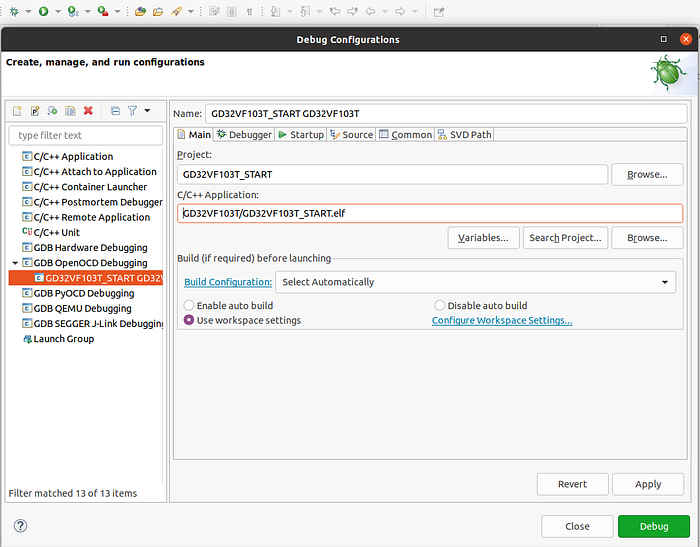
In the tab ”Main → C/C++ Application”, enter:
GD32VF103T/GD32VF103T_START.elfIn the tab ”Debugger → Config options”, enter:
-f "interface/cmsis-dap.cfg" -f "target/gd32vf103.cfg"This will tell OpenOCD to use CMSIS-DAP to connect to the target board and that it will be communicating with a RISC-V GD32VF103 microcontroller.
Now we are all set, we should be able to compile and debug the blinky led program!
Running the debugger
When you click Debug, it will start compiling the source code and download the program into the MCU. This may take a small moment after which the debugger will stop at the first line of the source code.
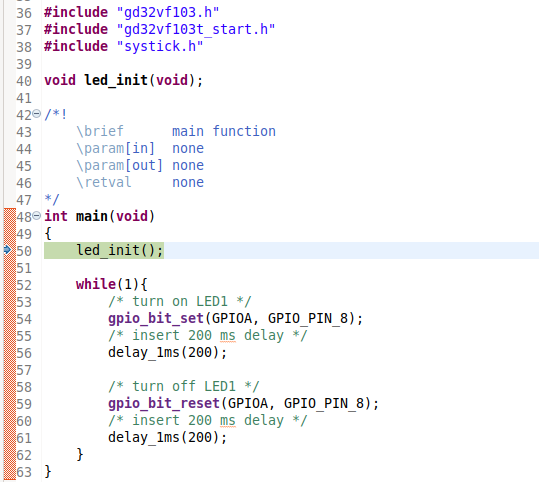
Now you can step through the code by pressing F10, this will toggle the LED ON and OFF. You can also hit F5 to run the code without intervention, and this will show a blinking LED.
Now that the example LED project is working, you can create all kinds of programs based on this project configuration.
Conclusion
In this guide you have read about the GD32VF103 RISC-V based microcontroller. You have learned how-to setup the eclipse development environment, and you can now successfully compile and run the blinky LED example program. Furthermore this project provides a great starting point for creating more complex applications, using advanced hardware features.
Solving Issues
Issue 1: Connecting to the GD-Link development board fails
If you get an error stating you cannot connect to the GD-Link device, for example:
Error: unable to open CMSIS-DAP device 0xc251:0xf001
Error: unable to find a matching CMSIS-DAP device
Even though the development board is connected and visible with ‘lsusb’. This is usually an access rights issue. In order to solve this you need to tell Linux that when a new USB device with a certain vendor id is inserted, all users should be allowed access. This means you forgot to copy the 60-openocd.rules to the /etc/udev/rules.d/ directory. See the OpenOCD chapter for more details.
Issue 2: Failure to program the GD32VF103 flash memory
Error: ‘Cannot program because flash driver is not present in OpenOCD’:
https://www.mail-archive.com/openocd-devel@lists.sourceforge.net/msg12471.html
The OpenOCD version you are using is missing the flash programming functionality, which means OpenOCD is not able to program the microcontroller flash memory. The solution is to download a version of OpenOCD which does support the flash programming. See the chapter on OpenOCD for details.
References
https://github.com/riscv/riscv-gnu-toolchain
The RISC-V webpage with instructions on how-to install the tool-chain on Ubuntu.
https://www.tme.eu/nl/en/details/gd32vf103t-start/development-kits-others/gigadevice/
The shop where I bought the development board.